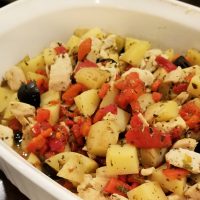
Search Results for: label/Meal Planning

Plan Ahead for Inexpensive Takeout

As much as I rely on menu planning to help us eat well (and frugally) on busy weeknights, it’s nice to have a back up plan. Today’s LivingSocial deal is perfect for that! It’s $14 for an Original Rotisserie Chicken Feast at Chicken Out (in VA, DC and MD). You get a whole chicken plus two large sides and bread, enough to feed 4-5 people. The limit is one certificate per person, and you have until March 17th to use your certificate.

There’s always a night where things go haywire, but that doesn’t mean you have to spend a fortune on takeout. Enjoy!

Thank You!

Image from LorenSztajer

I’m out of town right now–back in California for the first time since we moved 4 years ago–and I’m taking a few days off. Don’t worry–there are plenty of prescheduled posts, and I’ll still check in on Facebook and Twitter, mostly with photos of my adventure (it’s a half work/half relaxation trip). But now is a good time for me to stop and say

Thank you!

Thank you to all of you who’ve been reading MoneywiseMoms for the past 2 1/2 years. Thank you to those of you who are new here, and to everyone in between! I appreciate you checking in every day or receiving your subscription through email or RSS reader. I love reading your comments and emails, love hearing about your successes and even of your challenges (I like to try and help when I can!).

Thank you for helping me stay accountable to my own family with meal planning, setting financial goals, and cooking healthy meals. I have really appreciated your support, with all your comments, FB messages and email as I’m transitioning to a gluten-free lifestyle to improve my health (it’s the first significant improvement I’ve had to my IBS in 15 years). Thank you for sharing my strategies, deals, stories, and blog with your friends and family. It’s because of this blog’s growth that I’m able to pay down debt using my earnings from MoneywiseMoms. Now I’m sharing how you can earn too, if you’re a blogger, and I’ve been chatting with some of you via Skype, email and Twitter, and we’re helping each other work through challenges and sharing each other’s successes.

To all of you wonderful MoneywiseMoms Readers, thank you. Connecting with you is such a gift!

WFMW: Blogging Tips

For months I’ve been wanting to write a series of Blogging Tips, to cover topics I’m asked and emailed about all the time, but I just haven’t found the time. I think I’ll devote a bunch of Wednesdays to some quick snippets and call it Blogging Tips that Work for Me. Hopefully they’ll work for you too. Back when I did my reader survey (in January), it told me there were a LOT of bloggers who read MoneywiseMoms. Whether you’re writing a personal blog or are trying to make some money with your blog, hopefully you’ll find these tips helpful. And if you have questions, just leave them in the comments and we’ll help each other out. So here we go!


Tip #1 is….Use blog memes as accountability for yourself, both personally and professionally.

For example, each week I post my Meal Plan Monday, which means that I have to take time over the weekend to plan out the week’s meals and make a grocery list. I did this for over a year before I started blogging, but it wasn’t until I had the accountability of that Monday post that I did it regularly. And, without fail, if I don’t take the time to do the work, don’t put up the post, our meals are helter-skelter all week (usually ends in take out or something expensive and/or unhealthy).

When you make a regular post on your blog, not only does it keep you accountable, but your cheerleaders step up and encourage you (readers making comments). It helps keep you motivated and feels great. That’s why I’m telling you that I want to use WFMW to post these blogging tips (they’re just sitting here in a notebook!); it will keep me accountable and I have a small goal each week. If you need ideas for a meme, check out this huge list of blog memes. You’re sure to find one that matches your blog genre or writing style. You can set tiny goals for yourself personally–with cooking, organizing, or gardening–or choose one that helps you grow professionally in your posting and writing. You can also use blog memes to Increase Your Traffic/Subscribers.

What memes are you participating in?

For more Works for Me Wednesday tips (not just blogging–all types!), head over to We Are That Family.

2010 Personal Goals

I suppose it’s a sign of the times, but my personal goals are very affected by the blog. I’ve learned over the past two years that by holding myself accountable, I’m more likely to get things done. Look at Meal Planning; by knowing it had to be typed up every Monday, I was sure to make that meal plan and grocery list each week. It really helped! So this year, I’m hoping that you’ll cheer me on and keep me accountable for these goals:

1) Be more physically active. I mentioned this before, but I really do need to decrease my screen time and increase my activity level. I find this really difficult with the winter weather. For now, I plan to walk indoors when I’m without the twins (when they’re in school or on the weekends), and I have been creative by doing “Dance Party” with the kids and using the stairs a lot at home. I don’t have a solid plan for this goal (bad, I know), but I can tackle it by the end of this month.

2) Reconnect with real people. This goes along with #1, but I’ve been neglectful of family, friends, and community because of the computer. I’m making a trip back to California (for the first time since I moved in 2006) to reconnect with friends, and I want to be more supportive of my children’s schools by volunteering and connecting with parents there. I also need to get off the computer several nights a month to get out of the house with friends or my husband. I’m also going to send more thank you notes and other real mail to share my words and feelings.

3) Do something creative every month. I really enjoyed participating in DIY Days last year, but I couldn’t keep up doing it every week. I was reminded how much I enjoyed making things with my hands, and it’s been fun to decorate my house with my (and my kids’) creations. To accomplish this goal, I’m planning to host a Girls’ Night In with my friends once a month, with a different craft project that I’ve been wanting to do, and I’ll share those projects with you here on Moneywise Moms.

4) Get caught up on my family scrapbooks. Once upon a time, I had lots of time and no children. Now, I have lots of children and no time. But the many years I scrapbooked and even worked as a Creative Memories consultant, I did so knowing my young children would have my pages of journaling and memories of our life together. But they don’t. This is another casualty of my excessive computer use, so it’s ironic that I plan to use digital scrapbooking to accomplish this goal. I’ve had my CM Storybook Plus software for a while now, but I need to set aside the time to do the tutorials and get started. I know that it’s the solution for me; I’ll be able to capture my photos and journaling in much less time than paper albums.

These are lofty goals, but I need to tackle them along with my Financial Goals for 2010. I appreciate your support!

Have you made any personal goals for the New Year? I’d love to hear what you’re thinking about.

Italian Spinach Pie Recipe

This Italian Spinach Pie recipe makes my Meal Plan rotation often because it’s one of my family’s favorites and because it’s so easy to make. I serve it all the time when we have vegetarian company, and it’s a moneywise meal since it doesn’t include meat. I usually serve it with corn muffins and salad, but it’s great with French Baguettes or any kind of yummy bread. My sister shared this recipe with me a few years ago, but I just did a quick search and it looks like it comes from the Kraft website. Let me know if you try it!

ITALIAN SPINACH PIE

1 container (16 oz) Low Fat Cottage Cheese
1 pkg (10 oz) frozen chopped spinach, thawed, well drained
1 cup shredded mozzarella cheese
4 eggs, beaten
1 jar (7 oz) roasted red peppers, well drained, chopped
1/3 cup grated Parmesan cheese
1 tsp. dried oregano leaves

Preheat oven to 350. Mix all ingredients until well blended. Pour into greased 9-inch pie plate. Bake 45 minutes or until center is set. (Note–I take it out and let it “set,” or else it’s too wet for us).

For more easy recipes, head over to my Recipes Page or check out the Ultimate Recipe Swap at Life As Mom.

WFMW: Feed Your Kids, Party-Style

Three tricks that have been working for me lately:

1) There’s something magical about toothpicks, especially the ones with the frilly colored cellophane on the ends. Take two cranky toddlers at lunchtime, add a fancy toothpick to the dish, and suddenly it’s exactly what they wanted. My girls will eat anything with a fancy toothpick. Yes, it takes longer to finish the meal, but it’s worth it.

2) My kids are always clamoring around me while I’m making dinner, sometimes passing through the kitchen just to grab food because they’re starrrrrrving (have you heard that one before?). Lately, I’ve taken to putting out a bowl of fresh veggies with a little dip, party-style, which not only gives me the space to get dinner finished but also gives them a few extra servings of vegetables for their day.

3) Some weeks, we end up with a lot of leftovers of all those meals I planned. Every once in a while, there’s enough in the fridge to make what I call “Buffet Night.” I reheat everything, add a few new things, and we finish up our leftovers buffet-style. The kids love choosing what they want for their own plates, and it cleans out the fridge. It’s frugal, and it saves me from cooking that night.

For more Works for Me Wednesday tips, head over to We Are That Family.

Super Easy Chicken Soup

I’ve had a few comments and emails lately, particularly on Meal Plan posts, that suggest that some of you out there:

  • don’t cook
  • don’t know how to cook
  • but want to cook for your family (Yay!)

What you need is some easy recipes, I mean really easy recipes. I have a few for you. Let’s start with the way I make Chicken Soup:

Super-Easy Chicken Soup

Ingredients:
Chicken breasts**
Onion
Celery
Carrots
Starch of some kind (pasta, rice, potatoes, etc.)
Chicken stock or bouillon** (yes, you can make your own, but again this is easier for me)
Optional: Pesto and Lemon juice

**Yes, you can use a whole chicken and it would cost less, but this is more convenient for me. Same with the chicken broth; you can make your own stock, but this takes less time.

1. Set your water to boil. I measured, because I knew you would ask, and it was about 8 cups of water. While that boiled, I chopped up the onion, celery and carrots. How much? Depends on what your family likes. My kids love celery, so I put more of that in, plus I chop the onions tiny so they don’t notice them so much.

2. After the water boils, I add the bouillon, then the vegetables. Chop the chicken breasts into small pieces and add that as well. I use about half as much chicken in soup as I do when I’m serving chicken breasts as part of a meal. Soup really stretches your food dollar!

3. I set the stove lower and cover the pot, then let it simmer for a while, 45 minutes to an hour. Let the vegetables get tender.

4. If you want to be fancy, you can add a tablespoon or two of pesto and a good squeeze of lemon juice. It adds depth and a ton of flavor to the soup.

5. If you’re planning to serve the Chicken Soup right away, you can add your starch at the end; just pick pasta, rice, potatoes, whatever your family likes or whatever you have on hand. If you’d rather freeze it for a later date, leave the starch out. Just let it cool and put it in a zipper freezer bag.

6. Serve with some yummy bread or rolls. If you need ideas, check my Recipes page.

Chicken, Peppers and Potatoes

I’ve been trying to add our family’s favorite recipes (with photos, when they don’t frighten you), to my Recipes Page. One thing you can count on is that all these recipes are easy, since I find it difficult to cook with children attached to my legs. Most are relatively quick, and all are our “favorites” so they make the Meal Plan rotation often.

This chicken recipe comes from a book that’s unfortunately out of print, called Better Homes and Gardens Big Book of Healthy Family Dinners. I found this book at the library years ago and ended up using so many of the recipes that I bought the book from Half.com. Usually, BHG puts their recipes up at their website, but this one isn’t there, which is why I’m posting it below. This is a very easy meal with great flavors, and it’s one of our family favorites (even the kids love it):

Chicken, Peppers and Potatoes

12 oz. skinless, boneless chicken breast
Nonstick spray coating
2 cups diced potatoes (I leave the skins on, because I’m lazy)
1 7-oz jar roasted red sweet peppers, drained and diced
1/2 cup reduced-sodium chicken broth
1 1/2 tsp dried basil, crushed
1 1/2 tsp dried oregano, crushed
1/8 tsp salt
1/8 tsp black pepper
2 tbsp sliced pitted ripe olives
Fresh oregano (optional)

1. Rinse chicken; pat dry with paper towels. Cut into 1-in pieces. Spray an unheated large skillet with nonstick coating. Preheat over medium-high heat. Add chicken. Cook and stir for 4-5 minutes or until tender and no longer pink. Remove from skillet. Set aside.
2. Add uncooked potatoes, sweet peppers, chicken broth, basil, oregano, salt, and black pepper to the skillet. Bring to boiling; reduce heat. Simmer, covered, about 7 minutes or until potatoes are just tender.
3. Stir in the chicken and olives. Heat through. If desired, garnish with additional fresh oregano.
Makes 4 servings.

To keep this frugal, I buy my roasted red peppers at Trader Joe’s (they’re half the price than the grocery store), use potatoes when they’re on sale, and chicken from my Cooking Ahead prep. I do use a whole small can of olives, because my kids love them. I usually serve this with something green, like peas, and it’s a very pretty meal.

Hmmph. We ate this last night and I forgot to take a photo–sorry!

Where My Head is This Week

I’m in a rush to get to get my house clean and put together for what I’m calling the “Cavalcade of Company” that begins this Thursday* and will continue through Labor Day. It’s so we don’t have to travel with three small children or spend the money or sleep in guest rooms/hotel rooms with three kids who have, as we call them, “the jimmy legs.” You get no sleep, just kicked continuously in the stomach, groin, whatever awkward angle they’re in over the course of the night.

So I’m taking a break from Meal Planning this week, but you can still see what’s going on over at Menu Plan Monday at OrgJunkie. Yes, we’re still eating, but you can guarantee we’re eating the same old summertime fare that we did last week and the week before. I’m boring like that.

There are some good deals coming up at Safeway Wednesday, so I’ll get that to you, otherwise I’m going to link out to others so you don’t miss anything (like below). I also have a ton of home decor posts that I need to share with you, because that’s where my head is right now. I’m spending less time on the computer and more time working around the house. I

Here’s a link out: Apparently it’s Back to School season (!), so I’m sending you over to Affluent Pauper’s Back to School Deals post. She’s got a list of everything that’s on sale everywhere this week–and there are some great deals to be had at Staples and CVS–but I’m soooo not thinking about back to school. I’m just getting a handle on the summer!

*Thursday my in-laws are coming to visit, and by “visit” I mean we’re going to work on fixing all the drywall from our plumbing problems last month. And replacing a toilet and tile floor. And a whole list of other things. If we have time. Oh–and go to the Air & Space Museum.

Tuesday Giveaway: Magnetic Fridge Pads

You know I love the concept of meal planning. I post my own plans every week. And it’s one of my 5 Ways to Save on Groceries (with NO coupons). Really, though, I truly believe it in because:

  • We save money because we’re not eating out at the last minute.
  • We eat healthier because even home-cooked burgers & fries or homemade pizza are better than fast food.
  • It saves me mental energy every day, so I’m not thinking, “Oh, what are we going to eat tonight?” all day long.
  • It saves me a lot of stress during that lovely 4:00-6:00pm cranky kid time of day (it’s your kids, too, not just mine?). I know how long it takes to make, so I can either prep in the morning, put something frozen in the oven, etc.
  • When I make a weekly grocery list based on my meal plan, I shop less often (usually just once per week), saving me time and even more money because I’m not at the store where I’m tempted to buy more, more, more!

I want to encourage you to do a weekly meal plan for your family. Or maybe you’re already doing it, but you need a little excitement, a little something to pep things up. Today’s Tuesday Giveaway is this set of Magnetic Fridge Pads. One lists the days of the week, and the other is just a lined pad for your grocery list, to do list, whatever. You have two chance to enter:

Simply complete the form below. If this is your first entry, tell me whether you already do meal planning or not.

If you are a subscriber, you get a second entry. Complete the form a second time and enter “subscriber.” THANK YOU for reading my blog! If you’re new here and would like to subscribe, do so via email or RSS feeder and complete the form to get your second entry.

If you can’t see the form below because you’re reading this in an RSS reader, just click over to Moneywise Moms to enter. I’ll use Random.org to draw the winner at 10:00pm EST on Saturday, May 9th. One entry per household, please. Thank you for reading Moneywise Moms, and good luck!

**Update: This giveaway is over. Thanks for entering!

Cook Once, Eat 10 Times (Winter Edition)

I’ve been waiting and waiting for the 93% lean ground beef to go on sale at the previous lowest price of $1.99/lb, but it hasn’t happened in months. I broke down and paid $2.99/lb for it last week, which apparently is the new lowest price, because I’m starting to see that at all three chain grocery stores in my area. Since we’re trying to eat less red meat to be healthy, hopefully the price increase won’t be noticeable. It’s still worth it to buy in bulk, prep and/or cook, and freeze the rest so I can lock in that $2.99/lb price. At the end of the summer, I did a tutorial on prepping 10 lbs. of ground beef, but I avoided using the oven. This time around, I’m focused on meatloaf, soups, and other cold-weather meals. If you’re new to the “cooking ahead” concept, here are a couple of things to keep in mind:

  • Original once-a-month cooking calls for a month’s worth of groceries, recipes, and cooking. I’ve made this manageable for myself by focusing on one type of meat (chicken, ground beef, etc.) at a time.
  • By sticking with one type of meat, I’m saving money because I’m doing the cooking when the meat is on sale instead of purchasing a month’s worth of food no matter what it costs.
  • I’ve learned through trial and error that 10 lbs. is the right amount for me; I’ve tried cooking more at once but it takes more time and energy than I can give in one cooking session. If 10 lbs. seems like too much to you, just buy one “big pack” of 3-4 lbs. and start with that.

Where do I Start?

Just as with the chicken version of Cook Once, Eat 10 Times, I sat down with my recipe book and planned out the meals I wanted to have; that told me how much ground beef I needed to prep each way. My plan was for 10 meals’ worth: 3 pounds for pre-cooked meat mix to use for tacos plus a pan of lasagna, 2-3 pounds to make 2 meatloaves, and the rest (approx. 3-4 lbs.) made into meatballs for 2 pasta meals and Meatball Soup. There are many other options; I listed the recipes at the end of this post.

What do I Need?

Besides the ground beef, you’ll also need:
Green peppers and onions (for pre-cooked meat mix)
Tomato sauce, mozzarella cheese, eggs and ricotta/cottage cheese (for the lasagna)
Parmesan cheese, bread crumbs, eggs, basil, oregano, salt & pepper (for meatballs and meatloaf)
Tomato sauce, canned mushrooms (either stems & pieces or sliced), and mozzarella cheese (for the meatloaves)
Gallon-size zipper freezer bags, Wax paper, 9×12 pan for lasagna
REALLY big bowl (to fit 5-6 lbs of meat), large frying pan, cookie sheet (make sure it fits in your freezer)
Paper towels and soap (LOTS of hand washing!)

Let’s Get to Work:

  1. Prep your work area—send the kids out with Daddy, put on some good music, and gather all your supplies.
  2. Start with the meat mix: Clean and chop your veggies. I used one large green pepper and one large onion for 3 lbs. of meat. Saute your veggies in a large frying pan, then remove them from the pan.
  3. Brown your ground beef; I used about 3 lbs. this time around. I just eyeball the pounds when I’m breaking up the “big packs” from the store. While that’s browning, get the rest of the meat in a really big bowl. You’ll want it to have the chill out before you get your hands in there making meatballs!
  4. When the beef is done browning, drain it, then add the peppers/onions to the pan and combine them. Turn off the stove. Once it has cooled, you can distribute approximately two-thirds into 2 freezer bags for tacos/crockpot meals. I’ll use the third that’s left to make lasagna.
  5. You could freeze that last third and make the lasagna another day, but I figured I was already in the kitchen, so I might as well get it done. If you have a particular lasagna recipe, use that. I just use the one on the back of the noodle package. I used cottage cheese instead of ricotta to cut some fat out of the recipe. You can either cook it tonight (yum), or wrap it well with aluminum foil and freeze the whole pan for later.
  6. In a large bowl, mix the remainder of your meat (mine was approximately 6 lbs. worth) with six eggs, about 1 1/2 cups of bread crumbs, 1 cup of Parmesan cheese, several teaspoons of basil and oregano, and some salt and pepper. Sorry I’m not more specific here; I really do eyeball it instead of measure. Basically, you want the eggs to moisten the meat, and then the breadcrumbs make it not-too-moist. It’s easier to mix it with your hands–just get in there and squish it–which is why you don’t want the meat straight out of the fridge (you’ll feel like you have frostbite). This is my meatball recipe, and I use the same for meatloaf, so it comes out like a giant meatball. I suppose you could call it Italian meatloaf because it differs from a typical recipe.
  7. To make the meatloaf, I take about a pound’s worth (again, eyeballing it) from the bowl and put it on wax paper, forming a flat rectangle. Once it’s flat, sprinkle some mozzarella cheese and the drained mushrooms in the center. Use the wax paper to roll up the meatloaf into a roll shape, and tuck in the ends to seal it.
  8. If I’m not cooking it right away, I’ll wrap the meatloaf in aluminum foil and freeze it. To cook it, put the defrosted loaf in a shallow casserole dish or loaf pan, pour some spaghetti sauce on top, and bake at 375 degrees for 40-50 minutes. I made two of the meatloaf rolls and used the rest of the meat in the bowl to…
  9. Make the meatballs by lining a cookie sheet with wax paper and place the meatballs there as you form them. This will go into the freezer for 1-2 hours and “flash freeze” the meatballs so you can throw them into zipper bags. I made enough regular-sized ones for two freezer bags; I’ll defrost those another day and cook them for a spaghetti dinner. I made a bag of teeny-sized ones for Meatball Soup (see recipe below).
  10. Don’t forget to label your freezer bags with the date and what’s in them or what meals they’re for. I love going into the freezer and finding “Tacos;” I just grab the bag and throw it in the fridge to defrost for the next day. Freeze your bags flat until they harden; then you can stack them or store them upright like books and they’ll take up very little space. You can store these in a side-by-side freezer that way.
  11. Clean up–ugh, can’t someone else do that?

Let’s Eat!
Since I do my meal planning each Monday, I know what days I need to take something out of the freezer to defrost. Make sure you defrost in the fridge for at least 24 hours (safety guidelines here). With the pre-cooked meat mix, there are so many meals that are faster to prep because you’ve saved yourself the time of standing at the stove cooking the meat:

  • Meat Tacos—reheat the meat mix in a frying pan, then add shells/tortillas and all your fixings.
  • Shepherd’s Pie–put the defrosted meat mix in the frying pan and pick up the recipe from there. Use frozen mashed potatoes or leftovers from another night to prep this meal in about 5 minutes before baking.
  • Baked Ziti–by having the meat pre-cooked, your prep time is very quick and you can get this right in the oven.
  • Spaghetti Sauce—reheat the meat mix and add to jarred or homemade spaghetti sauce.
  • Taco Bake—here’s a crockpot recipe with Mexican spicing. We tried this and it was a big hit with my husband (the kids didn’t like the spicing).
  • Crockpot Chili—you’ve eliminated the time needed to brown meat before adding to the crockpot.
  • Meatballs—if frozen raw, defrost these and drop into a simmering pot of spaghetti sauce. Cook for at least an hour. Alternately, you could pan-fry or bake these before you freeze them, saving you more time on a weeknight. Once they’re defrosted, they just need to be heated back up since they’re already cooked. By freezing them that way, they’re also easy to heat up to feed to toddlers for lunch.
  • Lasagna–again, I just used the recipe on the box.
  • Meatball Soup–I just love this recipe. It’s so hearty, and I love all the textures going on in each bite.

What are your Thoughts?

I have gotten some great feedback from those of you who have tried Cook Once, Eat 10 Times because you find it easier to focus on one meat at a time. What is working for you? What do you find challenging? What other questions do you have?